Why Regular Kales Semi-Trailer Maintenance Matters
To ensure your Kales semi-trailer operates safely, reliably, and cost-effectively, scientific and scheduled maintenance is essential. This comprehensive guide provides transport companies and fleet owners with a practical, step-by-step maintenance plan—from daily inspections to in-depth servicing—complete with a detailed maintenance schedule table to help you proactively manage vehicle condition and eliminate safety risks.
Note: For ABS (Anti-lock Braking System) inspection and repair, always refer strictly to the dedicated ABS manual.
Kales Semi-Trailer Maintenance Schedule: Daily & Periodic Inspection Checklist
Proper maintenance prevents unexpected breakdowns and extends service life. Below is the official Kales semi-trailer inspection and maintenance table, covering checks at daily, monthly, quarterly (March), and annual (December) intervals.
Semi-Trailer Daily & Periodic Inspection Table
| Inspection Item | Sub-Item | Inspection Frequency | Acceptance Criteria | Notes | |||
|---|---|---|---|---|---|---|---|
| Daily | Monthly | March | December | ||||
| Parking Brake Valve | Braking Function | ✓ | Handle must engage/disengage parking brake smoothly | Inspect in parked state | |||
| Air Brake System | Air Pressure | ✓ | Operating pressure: 0.8–0.85 MPa | ||||
| Seal Integrity | ✓ | No moisture allowed in system | |||||
| Parking Brake Performance | ✓ | Must function normally | |||||
| Hoses & Fittings | Damage/Cracks | ✓ | Replace if cracked or damaged | Replace hoses every 2 years Retighten fittings annually |
|||
| Brake Chamber | Air Leakage | ✓ | No leakage permitted | Inspect under towing condition | |||
| Condition | ✓ | No cracks, wear, or damage | Replace diaphragm every 2 years | ||||
| Air Build-up | ✓ | Should pressurize normally | Towing condition | ||||
| Pushrod Stroke | ✓ | Standard: 30–35 mm Max limit: 50 mm |
Towing condition | ||||
| Emergency Relay Valve & Air Tank | |||||||
| Brake Camshaft | Function | ✓ | Must operate normally | Towing condition | |||
| Exhaust Sound | ✓ | Normal exhaust noise | |||||
| Internal Condition | ✓ | No water accumulation | |||||
| Wear | ✓ | No excessive wear or damage | |||||
| Brake Drum & Lining | Clearance | ✓ | Auto-adjusted to 0.3–0.5 mm | ||||
| Brake Lining | Wear | ✓ | Replace when worn to limit | Replace if rivet head is <1 mm below lining | |||
| Brake Drum | Wear | ✓ | Standard dia.: 420 mm Max dia.: 422 mm |
Replace if over limit | |||
| Spring Brake Chamber | Function | ✓ | Must auto-apply when air pressure ≤ 0.4 MPa | ||||
| Axle | Cracks/Deformation | ✓ | Replace if cracked or bent | ||||
| Axle Parallelism | ✓ | Check for abnormal tire wear | Adjust tie rods to align | ||||
| Wheels | Tire Pressure | ✓ | ±20 kPa from spec (per tire size) | ||||
| Cracks/Damage | ✓ | Replace if severe | |||||
| Tread Depth & Wear | ✓ | Minimum tread: 3 mm | Per wear indicators | ||||
| Foreign Objects | ✓ | Remove stones, metal, debris | |||||
| Lug & Hub Bolt Tightness | ✓ | Torque: 392 N·m | |||||
| Hub/Bearing Play | ✓ | Adjust if excessive play | |||||
| Oil Seal Condition | ✓ | Replace if aged or damaged | |||||
| Leaf Spring | Broken Leaves | ✓ | Replace both sides symmetrically | ||||
| Linkage Components | U-Bolts & Nuts | ✓ | Torque: 490 N·m | ||||
| Link Rod Play | ✓ | Replace worn rubber bushings | |||||
| Equalizer Arm Play | ✓ | Replace if bushing worn | |||||
| Spring Alignment | ✓ | No lateral shift allowed | |||||
| Landing Gear | Operation | ✓ | Must raise/lower smoothly | ||||
| Inner/Outer Tube Damage | ✓ | No cracks or dents | |||||
| Mounting & Wear Points | ✓ | No looseness or severe wear at pivot/sliding parts | |||||
| Wiring | Connection Integrity | ✓ | No loose or damaged connections | ||||
| Jumper Cable Condition | ✓ | No cuts or abrasions | |||||
| Lights | Function | ✓ | All lights must illuminate | ||||
| Lens Condition | ✓ | No clouding or cracks | |||||
| Turn Signals | Function | ✓ | Must flash correctly | ||||
| Fifth Wheel Handle | Extension/Retraction | ✓ | Must move fully and smoothly | ||||
| Kingpin | Wear/Damage | ✓ | 50.8 mm → min 48.0 mm 89.8 mm → min 86.8 mm |
Replace if below limit | |||
| Container Locks | Function | ✓ | Must lock/unlock reliably | Annual check | |||
| Reflectors & License Plate | Condition & Mounting | ✓ | Clean, undamaged, securely mounted | ||||
| Chassis Frame | Cracks/Deformation | ✓ | Repair or realign if found | ||||
| Lubrication Points | Greasing | ✓ | Apply grease as needed |
Inspection Tips:
- Perform all checks with the trailer unloaded.
- When lifting, use a jack under the axle near the spring seat.
- Place a steel plate or thick wood between jack and frame to prevent slippage or damage.
9 Essential Kales Semi-Trailer Maintenance Steps Explained
3.1 Brake System Maintenance: The Core of Safety
- Connect the trailer’s air brake system to the tractor’s system.
- Pressurize to operating level and verify pressure via tractor gauge or emergency system gauge.
- With engine idling, fully depress the brake pedal and hold. Pressure drop must not exceed 50 kPa per hour.
- If leakage is suspected, apply soapy water to fittings—bubbles >3 mm in 3 seconds indicate a leak. Tighten or replace as needed.
- Close the tractor’s emergency shut-off valve, disconnect the emergency air line—brakes must auto-apply. If not, the emergency relay valve is faulty.
WARNING:
Never modify the brake air system—including adding water-spray brakes or tapping air from trailer tanks. This compromises braking performance and may cause catastrophic failure.In cold weather, moisture in the brake system can freeze inside valves (relay/ABS), causing brake drag, delayed release, or total lock-up.
- Daily: Drain all air tanks.
- Check the tractor’s air dryer—replace desiccant cartridge if saturated.
- Pushrod stroke must be 30–35 mm (max 50 mm). Left/right difference should not exceed 5 mm.
- Inspect brake chambers for leaks at the exhaust port—replace diaphragm if leaking.
- After replacing brake linings, reset the automatic slack adjuster:
- Turn hex head clockwise until lining contacts drum.
- Turn counter-clockwise ¾ turn (you’ll hear clicks).
- After adjustment, wheels must rotate freely. Test drive—vehicle should not pull to one side.
- Always drain air tanks after driving. Re-pressurize if excessive air loss affects brake function.
3.2 Inspect Air Lines & Fittings
- Check all hoses and connectors for cracks, abrasions, or leaks. Replace immediately if damaged.
3.3 Axle & Hub Maintenance
- Inspect axles and tires for bends, cracks, or damage.
- Lift axle with jack (use support block).
- Tighten inner hub nut to 340 N·m, then back off 1/8–1/6 turn.
- Rotate hub—tap gently with a hammer near bearing. If stiff, loosen slightly until hub spins freely with no play. Install cotter pin.
- Apply sealant to hub cap before installation.
- Daily: Check lug nut tightness. Retorque to 600–630 N·m if loose.
3.4 Tire Care: Maximize Life & Safety
- Under-inflation causes shoulder wear, ply separation, blowouts, and higher fuel consumption.
- Over-inflation accelerates center tread wear and increases risk of impact damage.
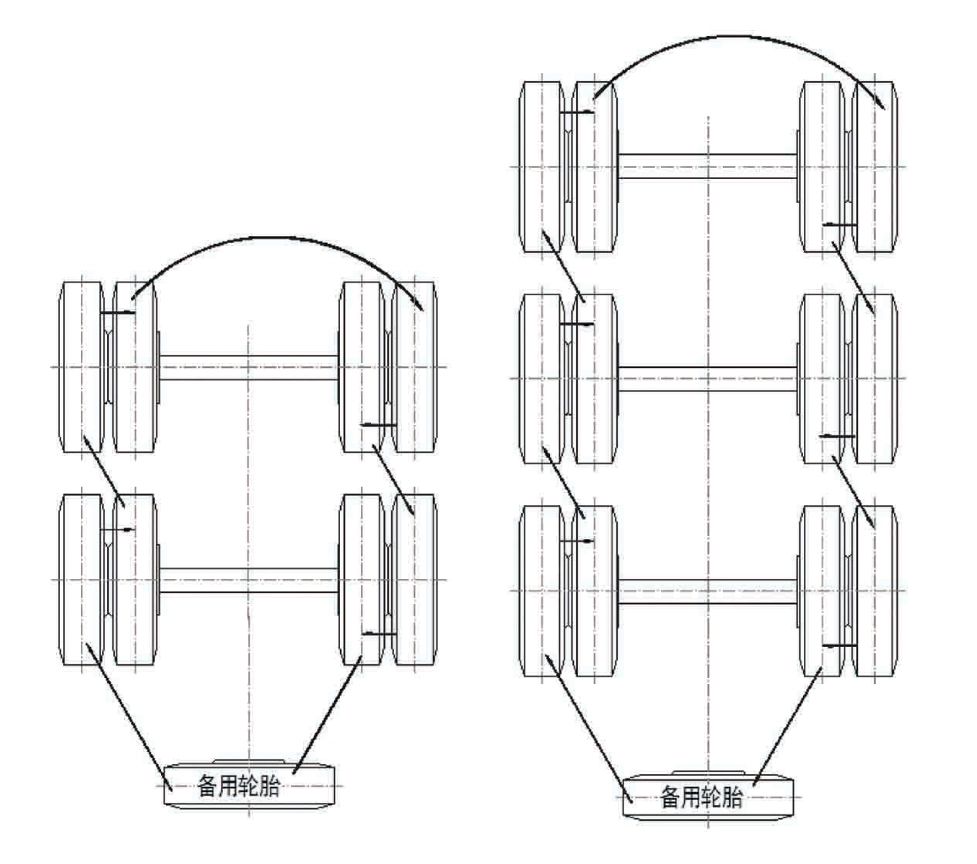
- Maintain correct pressure (±20 kPa) for all tires, including spares.
- Rotate tires every 5,000 km to equalize wear.
- Daily: Inspect lug nuts and foreign objects.
3.5 Suspension System Maintenance
Leaf Spring Suspension
- Inspect springs daily for breaks. Replace both sides if one is damaged to maintain balance.
- After heavy loads, retorque U-bolts to 600–650 N·m.
- After new springs or first 5,000 km, inspect and retighten U-bolts monthly.
- Check link rod bushings—replace if cracked or worn.
Air Suspension
- Avoid long-term parking. Drive a few km periodically to cycle air springs.
- After muddy or asphalt roads, clean air springs and pistons. Replace if cracked, wrinkled, or abraded.
- Every 6 months:
- Inspect air dryer/filter—replace if clogged.
- Check air line seals and valve tightness.
- Verify U-bolt and air spring mounting bolt torque.
- Every 3 months: Inspect shock absorbers for leaks or loose mounts.
- Monthly: Check main beam bushings—no play should exist when rocking the trailer.
- Every 6 months:
- Drain air tanks (every 2 weeks in freezing weather).
- Verify ride height (H-value)—must match factory specification to ensure proper coupling and stability.
3.6 Landing Gear Maintenance
- Inspect for smooth operation, deformation, or damage to inner/outer tubes. Repair or replace as needed.
3.7 Kingpin & Fifth Wheel Maintenance
- Inspect kingpin daily for cracks, wear, or scoring.
- Replace if diameter < 48.0 mm (50#) or < 86.8 mm (90#).
- Clean and inspect fifth wheel plate—remove debris, check for warping.
- Lubricate kingpin and fifth wheel daily with high-quality grease (e.g., calcium-based ZG-4).
3.8 Chassis Frame Inspection
- Periodically inspect frame welds and main beams for cracks or distortion. Repair immediately if found.
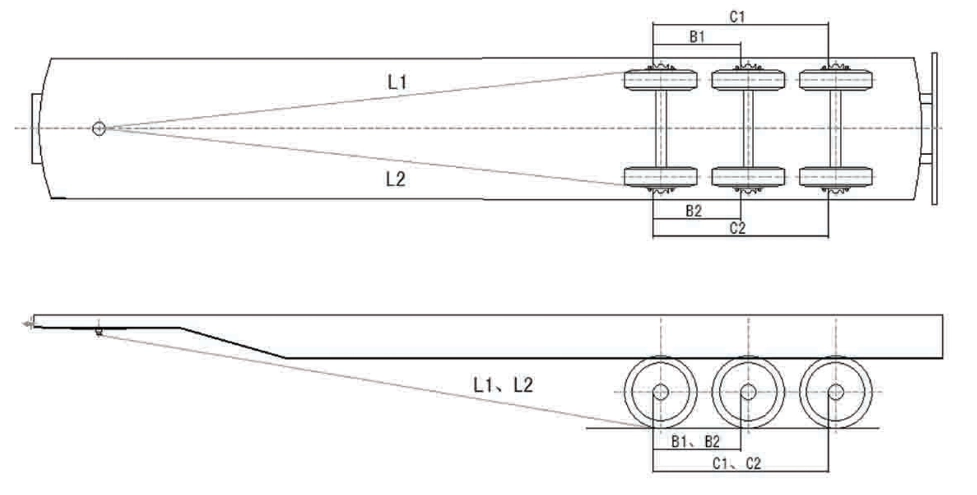
3.9 Axle Alignment & Wheelbase Adjustment
Misalignment causes uneven tire wear and pulling. Check if U-bolts loosen or bushings wear.
Procedure:
- Park on level ground, uncouple tractor, release brakes.
- Adjust landing gear so front and rear frame heights match (±2 mm).
- Remove outer tires and dust caps.
- Drop plumb lines from front hub inner faces to ground—mark points.
- Measure from kingpin center to each point (L1, L2). Difference must be ≤ 2 mm. Adjust front/rear tie rods as needed.
- Measure distance between front/rear axle points (B1, B2)—also ≤ 2 mm.
- Tighten all rod nuts.
- Drive 1 km, stop without braking, recheck dimensions. Repeat if needed.
- Replace worn bushings or retorque U-bolts if root cause is found.
Conclusion: Professional Maintenance = Lower Costs + Higher Safety
By following this Kales semi-trailer maintenance guide, you’ll significantly extend service life, reduce unplanned downtime, and enhance road safety. Consistent, systematic care is the most effective way to protect your investment and your drivers.
Don’t let a small oversight become a major failure!
🔧 Need technical support? Contact our service team for expert assistance or download the full Kales Semi-Trailer Maintenance Manual.