Keeping your Kales semi-trailer in top condition is essential for safety, compliance, and operational efficiency. Even high-quality trailers can develop issues over time due to wear, improper maintenance, or harsh operating conditions.
This comprehensive guide outlines the most common Kales semi-trailer problems, their root causes, and step-by-step solutions—organized by system for quick reference. Whether you’re a fleet manager, owner-operator, or maintenance technician, this troubleshooting resource will help you minimize downtime and maximize trailer lifespan.
Technical basis and diagnostic scope
How this semi-trailer troubleshooting guide is supported
This guide combines Kales service experience on export semi-trailers with public inspection logic used by professional fleets. The inspection framework follows the same safety priorities described in the CVSA North American Standard Inspection levels: brakes, air leakage, suspension, axles, wheels, tires, lighting and coupling hardware must be checked before a loaded vehicle returns to service.
The brake and wheel-end sections are also supported by CVSA Brake Safety Day inspection results, which show why brake defects remain a fleet priority. Tire diagnosis references NHTSA tire safety guidance, and electrical diagnosis references the SAE J560 seven-conductor connector standard. For ABS, EBS and RSS system context, this article links back to the Kales semi-trailer braking systems guide.
Exact service limits still come from the component fitted to the trailer: axle, brake chamber, slack adjuster, air valve, ABS ECU, suspension, landing gear and tire maker documents. If a trailer has air loss, smoking hubs, loose wheels, brake fire smell or unstable steering, park safely and call qualified service before moving again.
| Priority | Typical symptom | Action |
|---|---|---|
| Stop now | Hot hub, air loss, loose wheel, brake smoke | Park, chock, isolate and repair before movement |
| Repair before loading | ABS fault, uneven tire wear, light failure | Diagnose system and confirm correction |
| Planned service | Noise, slow landing gear, minor seepage | Record, monitor and schedule parts |
1. Brake System Failures
The brake system is critical for road safety. Ignoring early warning signs can lead to accidents or roadside violations.
1.1. Weak or Delayed Braking
| Symptom | Likely Cause | Solution |
|---|---|---|
| Reduced braking power | Excessive clearance (drum/lining) | Adjust clearance to manufacturer specs |
| Worn brake linings | Replace brake shoes | |
| Air leakage in brake circuit | Inspect lines and valves; repair leaks | |
| Faulty emergency relay valve | Replace repair kit or valve assembly |
1.2. Brakes Won’t Release (Dragging)
| Symptom | Likely Cause | Solution |
|---|---|---|
| Brakes remain engaged | Low air pressure (<0.8 MPa) | Restore air pressure to 0.8 MPa |
| Broken return spring | Replace spring in brake chamber | |
| Bent pushrod | Replace or straighten pushrod | |
| Incorrect stroke | Re-adjust stroke length per Kales specs |
1.3. ABS Warning Light On (New)
| Symptom | Likely Cause | Solution |
|---|---|---|
| Amber ABS light stays on | Sensor gap too wide | Push ABS sensor fully against tone ring |
| Damaged sensor cable | Inspect wiring for cuts; replace sensor |
2. Suspension System Issues
Suspension problems affect ride quality, tire wear, and cargo stability.
2.1. Noises from Suspension
| Symptom | Likely Cause | Solution |
|---|---|---|
| Clunking or rattling | Broken leaf spring | Replace spring assembly |
| Loose U-bolt nuts | Tighten to specified torque (refer to manual) |
3. Fifth Wheel (Kingpin) Problems
3.1. Handle Won’t Lock or Feels Loose
| Symptom | Likely Cause | Solution |
|---|---|---|
| Handle doesn’t engage fully | Improper position of locking hook | Adjust set screw on right side: • Clockwise → reduces play (tighten) • Counter-clockwise → eases operation (loosen) |
4. Axle & Wheel Assembly Faults
4.1. Wheel Wobble or Vibration
| Symptom | Likely Cause | Solution |
|---|---|---|
| Visible oscillation | Loose lug nuts | Retorque to manufacturer specification |
| Seized axle bearing | Replace bearing immediately | |
| Bent rim | Replace wheel assembly |
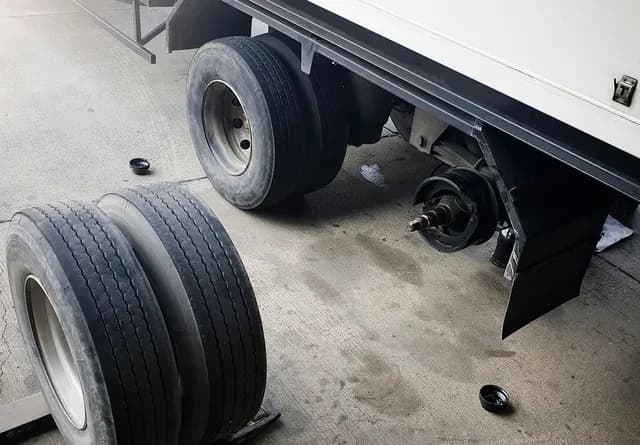
4.2. Overheated Wheels (Hot Hubs)
| Symptom | Likely Cause | Solution |
|---|---|---|
| Hot hubs after trip | Seized bearing / No grease | Replace bearing; use correct Grease (ZG-4 / Lithium) |
| Brake drag | Diagnose brake system (See Section 1) | |
| Over-tightened axle nut | Loosen and re-torque to spec |
4.3. Uneven Tire Wear
| Symptom | Likely Cause | Solution |
|---|---|---|
| Shoulder wear / Feathering | Axle misalignment | Adjust tie rods; check alignment |
| Center wear | Over-inflation | Inflate to Kales-recommended PSI |
| Cupping | Worn suspension parts | Replace bushings or shocks |
5. Landing Gear Malfunctions
5.1. Hard to Crank or Stuck
| Symptom | Likely Cause | Solution |
|---|---|---|
| Excessive resistance | Poor lubrication | Apply grease to gears and screw |
| Bent leg tubes | Replace damaged leg section | |
| Grinding noise | Worn gears | Disassemble and replace gear set |
6. Electrical System Failures
Electrical faults compromise visibility. Most issues are caused by poor grounds or corrosion.
6.1. Lights Not Working
| Symptom | Likely Cause | Solution |
|---|---|---|
| Lights flickering / Dim | Bad Ground Connection | Clean chassis ground point; check for rust |
| One light out | Burned-out bulb | Replace bulb; check socket corrosion |
| No lights working | Loose 7-way plug | Clean contacts; spread pins for better fit |
7. Advanced ABS/EBS Diagnostics & WABCO Fault Code Troubleshooting
Modern semi-trailers rely heavily on electronic safety systems. Kales semi-trailers utilize premium WABCO Electronic Braking Systems (EBS) or Anti-lock Braking Systems (ABS). When a system failure occurs, the amber ABS lamp illuminates on the trailer’s nosebox or the tractor’s dashboard, indicating that the Electronic Control Unit (ECU) has detected a diagnostic trouble code (DTC).
Diagnosing these electrical brake codes without a computer interface is possible using WABCO’s blink code functionality. By turning the ignition switch or diagnostic button ON and OFF in specific intervals, the ABS lamp will flash out numerical codes (blink codes). Understanding these codes allows mechanics to pinpoint failures instantly.
| Blink Code | Component / Fault Description | Root Cause | Recommended Repair Procedure |
|---|---|---|---|
| 4 – 1 | Wheel Speed Sensor (Sens-Axle 1 L) | Air gap too large; sensor disconnected; tone ring damage. | Measure AC voltage at sensor while spinning wheel (should be >0.2V AC). Adjust sensor bracket clearance to <1.0mm. |
| 4 – 2 | Wheel Speed Sensor (Sens-Axle 1 R) | Excessive hub play; dirty sensor face; cut wiring harness. | Clean road grime/metal shavings from sensor face. Verify wheel bearing play and tighten spindle nut if loose. |
| 4 – 3 | Wheel Speed Sensor (Sens-Axle 2 L) | Corroded connectors; sensor out of position. | Inspect ABS cable routing. Push sensor until it physically contacts the tone ring; it will self-adjust during first wheel rotation. |
| 4 – 4 | Wheel Speed Sensor (Sens-Axle 2 R) | Short to ground; broken copper conductor inside jacket. | Conduct continuity test between pins 1 and 2 of the sensor connector. Target resistance should range between 900 to 2000 Ohms. |
| 7 – 1 | ABS Modulator Valve (LHS) | Solenoid short circuit; internal coil burnt; loose ground. | Unplug modulator harness and check resistance across solenoids. Clean pins with contact cleaner; replace valve if coil is open circuit. |
| 7 – 2 | ABS Modulator Valve (RHS) | Moisture in valve housing; electrical short to frame. | Verify air dryer cartridge performance. Drain water from air tanks; replace relay valve if corrosion has reached electrical solenoids. |
| 14 – 1 | ECU Power Supply Voltage | Low voltage (<9.5V DC); bad ground connection on Pin 1. | Inspect 7-way tractor plug. Measure voltage under load at pin 7. Clean main ground bolt on the trailer frame. |
When replacing a WABCO modulator valve, always torque the mounting bolts to 22-28 Nm (16-20 ft-lbs) to avoid housing distortion. Additionally, ensure the exhaust port is clear of mud or road debris. Blocked exhaust ports prevent the brakes from releasing, causing immediate shoe glazing and dragging brakes.
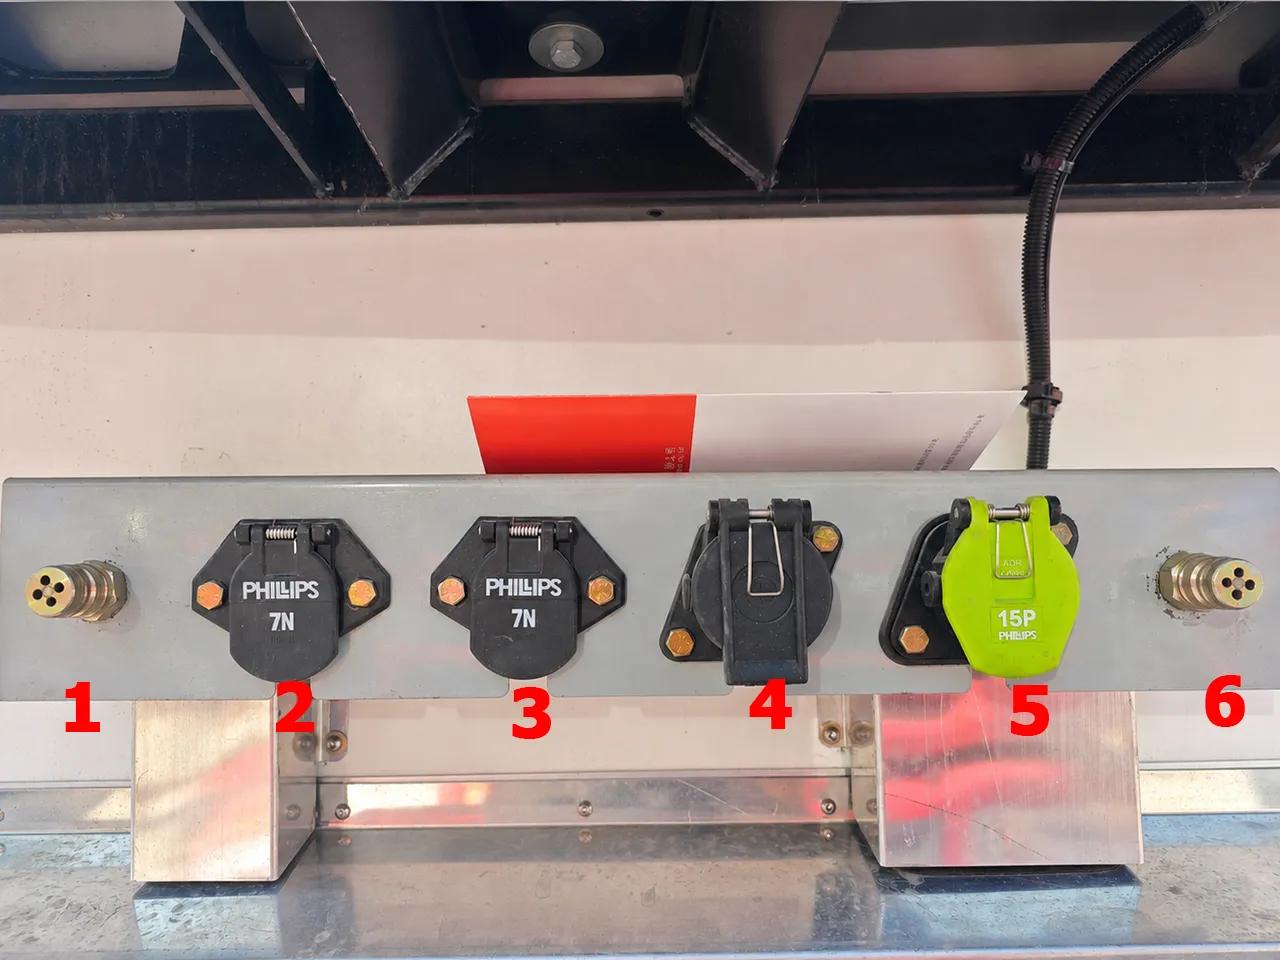
8. 7-Pin (SAE J560) Electrical Harness Voltage Drop Testing
Electrical failures account for a substantial percentage of trailer downtime, especially dim lights or flickering ABS warnings. The standard commercial connection is the SAE J560 7-pin plug, which supplies both constant and switched power. Corrosion or high-resistance joints can lead to a severe voltage drop, causing the ABS controller to malfunction (requiring a minimum of 9.5 Volts) while tail lights work normally.
8.1. SAE J560 7-Pin Plug Wiring Standard
- Pin 1 (White): Ground Return (Heavy gauge – must support total trailer current)
- Pin 2 (Black): Clearance, side marker, and identification lamps
- Pin 3 (Yellow): Left-turn signal and hazard warning lamps
- Pin 4 (Red): Stop lamps and anti-lock brake device power
- Pin 5 (Green): Right-turn signal and hazard warning lamps
- Pin 6 (Brown): Tail, license plate, and clearance lamps
- Pin 7 (Blue): Constant auxiliary power for trailer ABS unit
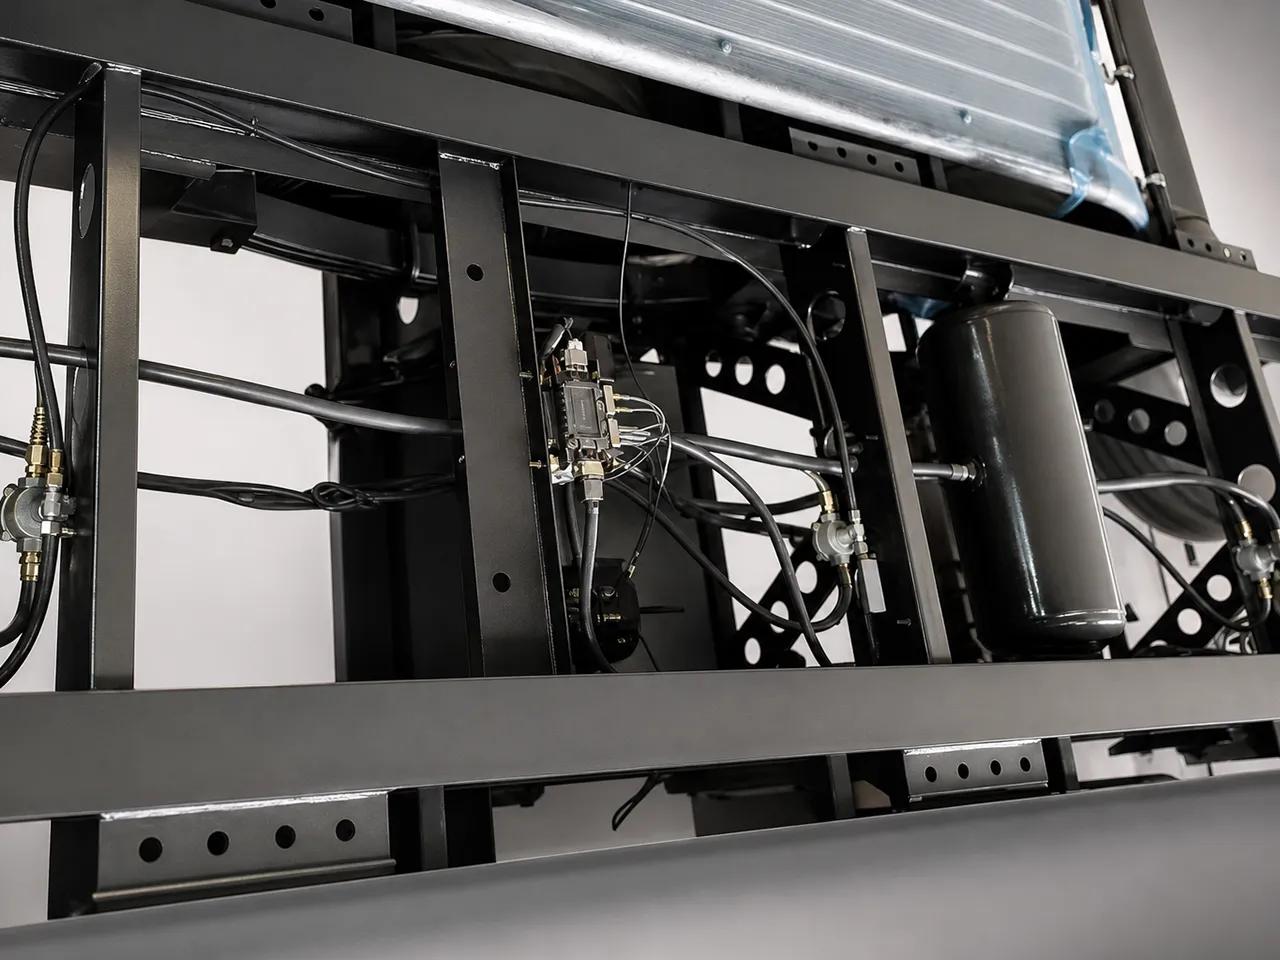
8.2. Voltage Drop Test Procedure
A simple resistance check using a multimeter can be misleading because a single copper strand will show continuity, but will fail to carry the required load. To perform an accurate voltage drop test under load, follow these steps:
- Connect the trailer to the tractor and switch ON all lights and hazard signals.
- Locate the main splice junction box (usually mounted on the interior front crossmember of the trailer).
- Set your digital multimeter (DMM) to DC Volts.
- Measure the voltage directly between the positive terminal (Pin 7 or Pin 4) and the ground pin inside the junction box.
- Compare this reading to the voltage measured at the tractor battery.
Diagnosis: The voltage drop must not exceed 0.5V DC. If battery voltage is 12.8V and junction box voltage is 11.2V (a drop of 1.6V), there is excessive resistance in the circuit. Typically, this is located at the nosebox socket terminals, which expand over time and lose clamping force. Use a J560 terminal cleaning tool to remove oxidation and spread the male pins slightly to restore contact tension.
9. Tire Wear Diagnostics and Mechanical Root Causes
Semi-trailer tires are a massive operating cost. Uneven tire wear is rarely a tire defect; it is typically a symptom of a mechanical problem in the suspension, alignment, or wheel ends. Understanding how to interpret wear patterns allows fleet managers to address the underlying cause before a tire blowouts occurs.
| Wear Pattern | Visual Description | Primary Mechanical Root Cause | Corrective Action & Maintenance Spec |
|---|---|---|---|
| Cupping / Scalloping | Undulating dips around the tire circumference. | Failed shock absorber; loose wheel bearing; worn spring bushings. | Replace shock absorbers (inspect for hydraulic oil leaks). Tighten axle spindle nut using 3-step torque method to ensure correct bearing endplay (0.001″ to 0.005″). |
| Feathering | Tread blocks worn smooth on one side and sharp on the other. | Axle misalignment (toe-in or toe-out). | Measure distance between kingpin and front axle hub ends using an alignment bar. Ensure variance is within +/- 1.6mm (1/16″). Adjust axle collar adjusters. |
| Shoulder Wear (One Side) | Smooth wear isolated to the inside or outside shoulder. | Bent axle tube; overloaded trailer causing axle camber deflection. | Check axle camber using an electronic level. Replace axle tube if bent permanently. Do not exceed rated gross axle weight rating (GAWR). |
| Center Wear | Tread in the center worn significantly deeper than shoulders. | Consistent over-inflation. | Adjust cold tire pressure to match the load-inflation tables provided by the tire manufacturer (typically 100-110 PSI for standard dual assemblies). |
| Flat Spotting / Diagonal Wear | Isolated flat patches across the tread width. | Seized brake adjuster; out-of-round brake drum; aggressive brake lockup. | Verify automatic slack adjuster function. Check drum runout using a dial indicator (maximum allowable runout is 0.25mm / 0.010″). Replace drums if warped. |
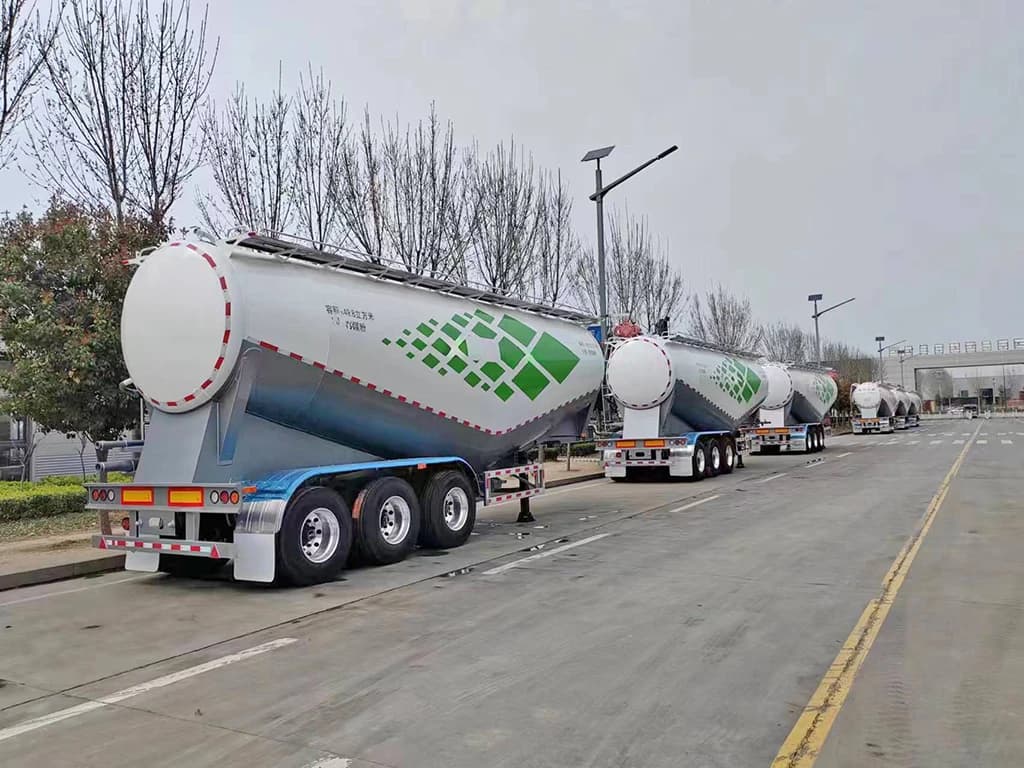
10. Regional Environmental Challenges & Fleet Case Studies
Kales semi-trailers operate in diverse global environments, each presenting unique wear patterns and failure modes. Maintenance schedules must be tailored to these conditions to prevent premature failures.
10.1. Mountain Routes in Latin America (Brake Heat and Retarder Discipline)
On Andean routes in Peru, Chile, Colombia and Bolivia, long downhill gradients put continuous heat into trailer brakes. The safest response is not to cool hot brake drums with water at random, because sudden temperature change can shorten drum life and hide the root cause of overheating. Treat repeated hot-wheel reports as a system fault: tractor retarder strategy, descent speed, brake adjustment, lining condition, axle load and driver technique must be reviewed together.
Operational recommendation: For mining and mountain fleets, specify brake capacity before purchase, train drivers to descend in the correct gear, and inspect drums, linings, hub seals and ABS sensor wiring after severe routes. Fleets comparing drum, disc, ABS, EBS and RSS options should also review the Kales braking guide linked below.
10.2. The Sahel Desert and West Africa (Abrasive Dust Contamination)
Trailers hauling agricultural and construction goods along West African corridors (Côte d’Ivoire, Mali, Burkina Faso) face extreme dust and heat. Sand particles bypass standard air seals, entering the brake slack adjusters and wheel hub assemblies, where they combine with grease to form an abrasive grinding paste.
Trailers hauling construction goods, aggregates or agricultural cargo on dusty routes often show the same fault chain: abrasive dust mixes with grease, air tanks collect water and fine particles, landing gear screws become stiff, and wheel-end bearings run hotter than normal. This pattern is common on West African corridors, quarry roads and dry-season construction sites.
- Increase wheel-end, landing gear and slack-adjuster lubrication frequency during dusty seasons.
- Purge air reservoirs more often where humidity, dust and compressor oil carryover are present.
- Use protective boots where the operating route exposes screw shafts and adjusters to mud or sand.
- Record repeated hot hubs or hard cranking as route-related maintenance data, not isolated driver complaints.
Roadside Triage: Stop, Repair Before Loading, or Log for Service
A troubleshooting guide is only useful if the driver, dispatcher and workshop make the same release decision. Treat air loss, smoking hubs, loose wheels, cracked tire casings, locked brakes and missing brake lights as stop-now faults. Move the trailer only after it is parked safely, chocked and checked by qualified service personnel.
The evidence base supports this conservative triage. CVSA’s Brake Safety Campaign Results reported that the 2026 unannounced Brake Safety Day placed 574 of 4,021 inspected commercial vehicles out of service for brake-related violations. For tire-related triage, NHTSA tire safety guidance emphasizes inflation, tread, damage and load as safety-critical checks before a vehicle continues operating.
- Red: park and repair before movement when there is air pressure loss, a hot hub, a brake that will not release, a loose wheel, exposed tire cord or failed stop/turn lamps.
- Amber: repair before the next loaded dispatch when the ABS lamp is on, one lamp circuit is intermittent, a hub runs warmer than its axle mate, or tire wear shows a mechanical pattern.
- Green: log for planned service when the fault is minor, repeatable and does not affect braking, steering, wheel retention, lighting visibility or load support.
For yard release control, link the fault log with the semi-trailer coupling and pre-trip checklist. That creates one record from driver symptom to workshop cause and final release.
Related Kales maintenance resources
Final Thoughts: Prevention Is Better Than Repair
Most Kales semi-trailer failures stem from neglected maintenance or incorrect servicing. By following a structured inspection schedule—and addressing minor issues early—you can avoid costly repairs, roadside breakdowns, and safety incidents.
Need Professional Technical Support or Replacement Parts?
Don’t let trailer downtime impact your fleet’s profitability. Our engineering team can analyze your operational parameters and recommend the ideal components.
Need help applying this guide?
Share your trailer type, payload, routes, operating climate, and photos with Kales. Our team can review the key points from this guide and recommend a practical specification for your fleet.
- Send photos of your tractor, trailer, or current component layout
- Confirm payload, road conditions, gradients, climate, and duty cycle
- Receive a specification or maintenance recommendation within 24 business hours
Email: jennylee@kalestruck.com | WhatsApp: +86 131 5638 8843 | Request a quote